
Road Trip Essentials: Why a Car Tray is a Must-Have for Family Travel
When packing the car for a fun-filled road trip adventure, don’t take convenient interior space for granted. Even the roomiest minivans quickly fill hauling vacation

You did your research and found the perfect auto tray to solve your on-the-go organizational needs. But now comes the installation. Rather than winging the setup or worse, damaging your new gear, follow our simplified tips ensuring correct tray alignment the first time.
We’ll walk through universal best practices applicable to most standard vehicle models. Continue reading and soon you’ll be snacking in an organized style!
Before physically mounting components, validate a few quick details confirming your tray matches vehicle specifications.
Verify the wheel diameter or width falls within the tray mount’s listed range. Using a soft measuring tape, carefully measure across center points between opposite sides.
Most accommodate between 15-19 inches. If unsure of sizing, check your owner’s manual or manufacturer’s website for specifics.
Cross-check whether your numbers match published specs both adjusted close for driving and fully extended for easy entry/exit. Angled tilt adjustments can vary in diameter by several inches.
Test fit the tray while parked without attaching. Gauge total height and depth clearances accounting for tilt adjustments.
Watch for infringements from seat backs, knees, or low-hanging dash components. Check boundaries both legs are extended and bent as pedal positions affect postures.
You want total range to utilize the full surface without bumping surroundings. This includes reaching forward to the dash when driving plus pushed-back rotations for exiting the seat.
Determine the optimal contact point(s) for securing the tray base. Common options include attaching to:
Select areas clear of airbags and provide stability when mounted. Avoid wire harnesses which could disconnect sensors.
With prep work completed, it’s time for installation. Follow these step-by-step fundamentals applicable to most standard trays on the market:
If your model offers tilt, rotation or expandable capabilities, configure ideal alignments before locking down.
Set angles clearing knees and other impediments. Fully extend sliding elements to the desired position. You want total comfort and access before permanently affixing.
This helps visualize the optimal configuration so attachments anchor components for practical daily use rather than basic storage.
Attach all overhead mounting components first to support hanging weight as additional contact points get fastened.
Common pressure points like steering columns take significant forces when driving so anchor these areas initially.
Gravity becomes your friend allowing easier downward installations so start high and work your way down.
Working downward, firmly affix lower mounting straps or bolts through wheel wells, seat frames or other strong bases.
Pull adjustable straps uniformly snug on both sides. Turn locking screws evenly to prevent uneven torque twisting alignments.
Do final sweeps ensuring all joints feel equally secure and static with no lingering wiggle room or looseness.
Before loading gear, vigorously tug and twist the tray in all directions checking for instability or looseness.
It should stay firmly planted no matter the angle of force. If shifting, reexamine mounting steps and tighten straps further as needed.
Make this a ritual before each use until mounting integrity becomes second nature. Proactively identifying issues prevents spills down the road.
With the base solidly anchored, insert device holders, dividers, wrist pads and other modular attachments.
Slide components firmly into slots with a reassuring “click”. The more loaded weight, the more momentum you want to grip the tray in place through friction.
Accessories finalize configurations so make attachment additions only once certain base positions won’t need further adjustment.
Drive cautiously through turns, speed bumps and stops confirming no slippage before considering it completely secure.
Repeat tug tests between drives adjusting as needed until the tray feels like integrated cabin componentry.
Don’t assume stationary stability equals driving dependability until bumps and momentum demonstrate long-term reliability.
While most installations go smoothly, occasionally issues popping up are quick fixes:
If the tray drops vertically, upper mounts likely need additional anchoring support.
Supplement factory positions with hardened steel carabiners clipping to anchor points like locked seat belts, seat runners or seat release handles.
Dual contact points prevent single strap failure allowing gear to fall. Distribute weight across reinforced backups.
Excess wheel well wiggle side-to-side indicates lower bands need increased tension.
Wrap bands entirely around stable bases like rims or frame chassis 2-3 times rather than minimal contact. The added friction improves grip.
Use unstretchable braided ropes over adjustable straps vulnerable to loosening over time as synthetic fibers wear and elasticity fades.
Frequent detaching/reattaching stretches bands and wears plastic stability tabs.
Replace worn components with metal cinch buckles and steel-threaded screws improving long-term durability.
Or supplement with secondary elastic locking straps doubling security through redundancy.
Inspect for signs of breakdowns like frayed fabric or cracked plastics and preemptively swap before failures trigger accidents.
A weight pressed against wired sensors in steering wheels or dashboards triggers warning lights.
Redirect mounts to solid sections like seat bolts or floor edges clearing detection zones.
Avoid ignoring dash indicator warnings which exist for good reason. Move gear keeping the cabin safety system happy!
Once firmly installed, utilize the added organization with these space-maximizing tips:
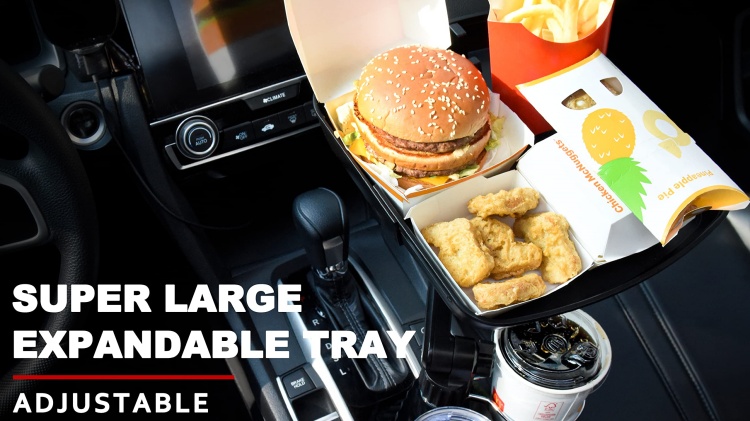
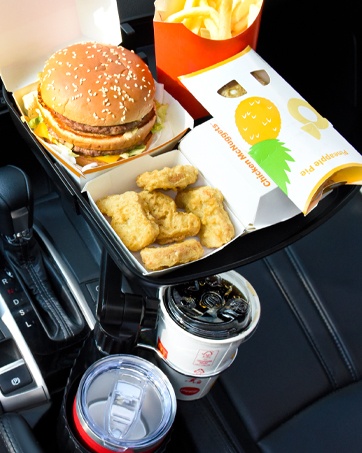
Spread snacks across several mini containers rather than overfilling a large one.
Greater surface contact equals better stability. Individual servings also prevent entire meals from spilling.
Flat and wide trumps tall and tippy every time. Make gravity work for your gear, not against it!
Place dense foods or bottles secured in cupholders closest to the bottom.
Concentrating mass low and centered on the tray prevents tipping from uneven weight distribution.
Heavy items want to drop anyway, so positioning them barely off the floor makes sense. Use compartment layouts strategically.
Take advantage of tiered designs offering both top-level and lower compartments.
Drinks, phones and other everyday gear fill upper trays while bags, boxes and loose items sit below.
Maximize capacity via layered arrays allowing quick access to favorites on top with bulk storage hidden underneath.
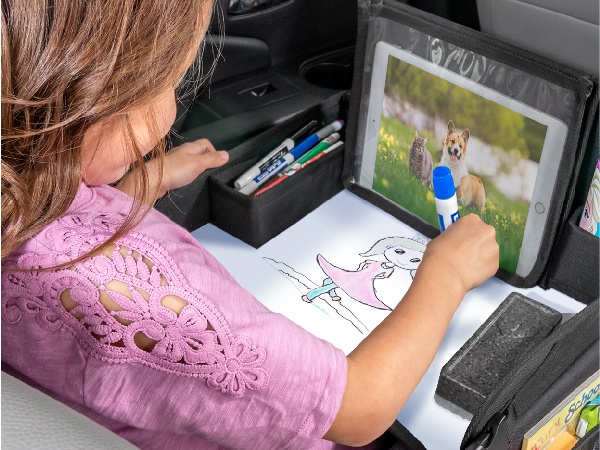
Use built-in docking slots or accessory pads locking expensive smartphones and tablets in place.
Corner elastic straps stretch snugly across edges keeping devices firmly centered during momentum shifts.
Don’t trust even gently braking forces against fragile $1000 computer screens and delicate phone cameras.
Napkins, plastic bags and other slippery cargo want to slide around turns.
Line compartments with shelf grip liner or secure items in anti-slip mesh pouches preventing excess movement.
If you can’t change the surface, change the packaging. Wraps, adhesives and textured containers prevent expensive runaway situations.
Loading everything close by means less reaching allowing better road focus. But never sacrifice safety by prioritizing convenience. Always secure items properly and keep focus forward when operating vehicles.
You worked hard to find the perfect organizational upgrade. Now it’s time to enjoy the added space tailored precisely for your unique model! Drive on!
The expanded wheels, higher clearances and cavernous cabins of trucks, vans SUVs and Jeeps require a few specialty considerations given their more generous dimensions. But with the right gear, oversized vehicle owners can tailor trays maximizing even the biggest rigs.
For plus-sized passenger capacity, choose extended-length trays spanning the full distance between steering wheels and doors. These expanding sidearms provide starship-sized surfaces catering to bench seats holding families.
Modular middle consoles bridging front captain chairs keep snacks within reach of thirsty second and third-row passengers way in the back. Kids want easy access to goodies without unbuckling precious car seats, so design compartments benefit minivan mobility.
Since larger vehicles offer more extreme suspension travel, reinforced mounts to withstand rugged off-roading over intense bumps and dips. Wide straps with steel cinch locks anchored to solid chassis tie-downs provide flexibility on the trails while keeping gear security locked tight.
Given the extensive dash real estate on full-size trucks, consider windshield mounts holding phones and tablets at eye level over sprawling hoods. Adjustable pole mounts maintain constant sightlines ideal for navigator assistance.
While you score heavy-duty hauling power, don’t overload cargo capacity by blocking rear views critical for trailering and parallel parking. Place accessories strategically avoiding blindspots.
On the opposite end of the spectrum, subcompacts and economy vehicles offer more confined quarters. But the right compact trays transform even the tightest spaces.
For small cars, prioritize thin, flat tray profiles hugging closely against steering wheels without protruding excessively into your space.
Choose models with flexible gooseneck mounts or multi-position locking arms allowing you to position platforms cleared of infringing knees and gear shifters.
Since diminutive engines vibrate intensely, use more but smaller suction cups over fewer giant ones to distribute adherence forces widely across dashboards. Weight balance prevents rattling platforms from working loose.
Take advantage of void spaces above gauges or below stereos which become perfect mounting points in cars lacking standalone consoles. Pocket organizers, phone cradles and cupholder inserts introduce capacity where none previously existed.
You also have more options for securing mounts to seat bolts within closer reach rather than distant wheel wells. For especially tiny builds, consider suction-cup bases clinging securely to smooth dashboards and windshields.
While you may lack excessive surface area, make the most of every inch with expandable trays. Collapsible half-moon shapes stores conveniently flush then deploy spacious secondary tiers as needed for meals or storage while driving.
Getting handy with DIY solutions can also overcome limited arrangements. Adhesive phone docks, seat back pouches, and custom console inserts introduce handy storage cubbies, pockets and holsters sized perfectly for the compact confines detailing your unique make and model.
So don’t despair of small space limitations! With the right tray tricks, tiny cars stay clean and organized too!
Did we miss any special use cases or configuration quirks? Let us know in the comments if you come across unique mounting scenarios not covered so we can share solutions to help all readers install trays tailored for their specific vehicles!
We monitor feedback closely to improve recommendations as the community encounters real-world examples testing the limits of drivespace functionality. Please share your experiences tweaking, modding and MacGyvering trays for particular autos!

When packing the car for a fun-filled road trip adventure, don’t take convenient interior space for granted. Even the roomiest minivans quickly fill hauling vacation

You scored big adding a car tray solving on-the-go organization. But the chaos of driving inevitably dirty surfaces with crumbs, spills and accumulated gunk. Don’t

Car trays solve organization, snack, and workspace needs for busy drivers. But their convenience should never compromise the safe operation of a moving vehicle. Always

Adding a convenient car tray or mobile desk opens up valuable space for storage, working, snacking, and other on-the-go activities. But with so many options

When packing the car for a fun-filled road trip adventure, don’t take convenient interior space for granted. Even the roomiest minivans quickly fill hauling vacation

You scored big adding a car tray solving on-the-go organization. But the chaos of driving inevitably dirty surfaces with crumbs, spills and accumulated gunk. Don’t

Car trays solve organization, snack, and workspace needs for busy drivers. But their convenience should never compromise the safe operation of a moving vehicle. Always
You did your research and found the perfect auto tray to solve your on-the-go organizational needs. But now comes the installation. Rather than winging the